Saturday, April 27, 2013

Java Brew Coffee House and Other Saturday Adventures

I hope everyone is doing well today! I am coming to you form Java House Coffee Shop in Montrose, CA.

This morning I went to the Glendale College Library. Guests have to park on the top lot. To get to the campus required a combination stair climbing and taking elevators. I love the view from the top.

Among subjects studied today are centriods, inverse problems, and surface integrals. Three hours went by and I left 20 minutes before the library closed, which only proves the saying "So much to do, and so little time."

Here is some of what studied today:
------
Centriods:

Points (x,y) each with mass m:

X-bar: Σ(x*m)/Σm, Y-bar: Σ(y*m)/Σm

Continuous functions, uniform thickness and density, f(x) ≥ g(x), limits a ≤ x ≤ b,

M_y = ∫(x * (f(x) - g(x)) dx, a, b)
M_x = 1/2 * ∫( (f(x))^2 - (g(x))^2, x, a, b)
M = ∫( f(x) - g(x) dx, a, b)

X-bar: M_y/M, Y-bar: M_x/M

Jon Guilleberg. "Mathematics: From the Birth of Numbers." W.M. Norton & Co. 1997

Normal Vectors

If a vector is perpendicular to another vector, the former vector is known as a normal vector. We can find a normal vector to any two vectors U and V by the cross product.

N = U × V

And the Unit Normal Vector:

n = (U × V)/|U × V| = vector/(norm of a vector)

Applying the normal unit vector to a said function z = f(x,y):

n = [-df/dx, -df/dy, 1] / √( 1 + (df/dx)^2 + (df/dy)^2 )

A unit vector has length 1.

Pretend that "d" is the partial derivative operator.

Surface area of z = f(x,y) over region R is:

∫ ∫ (√( 1 + (df/dx)^2 + (df/dy)^2 ) dx dy

H.M. Schey "div grad curl and all that" W.M. Norton & Co. 1992

Yes the title was in all lowercase. I get weirdly fascinated by all-lowercase titles.


Going to finish my lunch, and do some programming. Love to all of you!

Eddie


This blog is property of Edward Shore. 2013

Tuesday, April 23, 2013

HP 39gii Programming Tutorial - Part 8: Functions in Programs


HP 39gii Programming Tutorial - Part 8: Functions as Arguments

Apologies for the delay.

In part 8, I will show you several was you can use functions as arguments in programs. First, some pointers to help make the programming experience less daunting:

1. The HP 39gii is not a CAS machine. Everything must be evaluated to a number.

2. Functions are entered either as strings (expressions surrounded by quotation marks) or by the use of the QUOTE command. The QUOTE command can be found by pressing [Math], [ 1 ], [ 2 ]. It may help to store the required equation/function in E#/F# first before running the program, which is the case with PARTDER.

3. When using HP mathematical commands, you may have to store pass-through variables into global variables first. I am not sure why this is true for some commands but not for others.

4. The use of expressions and functions don't always work in programming. Use caution. I have particular trouble with SOLVE and FNROOT in this situation.

--------

Note: Recall there are two ways to store objects, one the store arrow ( →) and the assign operator ( := ). I usually code the latter, but for most applications, either way is acceptable. I use both methods in today's programming examples. And yes, we can use both methods in one program.

Hint: I often test commands and their usage at the Home screen to get a better understanding on how mathematical commands work. I also note their syntax by both using the command and accessing the help menu ([SHIFT] [Views]).

------

The Program PARTDER

PARTDER takes the partial derivatives of the function f(X,Y) at the point (x, y) and returns a list of the values {df/dx, df/dy}.

PARTDER takes two pass-through arguments:
x = value of x
y = value of y

Define f(X,Y) as a string into E0 outside the program.

EXPORT PARTDER(a,b)
BEGIN
a → A; b →Y; ∂(E0, X=A) → C;
b → B; a → X; ∂(E0, Y=B) → D;
RETURN {C, D};
END;


Examples:

"SIN(X*Y)+Y^2"→E0
PARTDER(π, 1) returns { -1, -1.14159265359 }

QUOTE(X^(2*Y+1))→E0
PARTDER(4,1) returns {48, 177.445678223}

Eddie

This blog is property of Edward Shore. 2013

Sunday, April 21, 2013

My Slide Rule Collection

I have a small collection of slide rules. Slide rules, which first made their appearance in the 1620s, was the calculator before electronic calculators became prominent in the 1970s.

Having been born three years after the slide rule disappeared from the mainstream I first came across slide rules for the first time when I found my grandfather's book "The Slide Rule and How To Use It". It took me a while to get an understanding how they work, but I think I have a beginner's idea how slide rules work, or getting used to the idea of logarithmic scales.

The scales I know about are:
C and D: Used for multiplication and division
CI and DI: Reciprocal of the C and D scales
A: the square of scale C and D
K: the cube of the scale C and D
L (and LL): logarithmic scales
S: sine
T: tangent

A → D: √
D → A: x^2
K → D: cube root
D → K: cube
S → D: (sin x°)/10
D → S: asin(x/10)... I think
D → L: log x
L → D: 10^x

I think the LL scale is a natural logarithm/exponential scale.

Thank you William Oughtred for inventing the slide rule.

Here is my collection:

Lawrence Deluxe Slide Rule with the book it came with: "The Slide Rule and How to Use It".

This what I found in the garage. Now this sits in my bookshelf.

Scales: A, B, C, CL, D, K

Keuffel & Essel Co. Model 4098A (I think I am correct on the model number)

I picked up this slide rule last year at a swap meet in Azusa for two bucks. What is interesting about this slide rule is that it is six inches long, has a five inch/13 centimeter ruler in the back. The middle part of the scale is removable to reveal the S, L, and T scales in the back.

Scales: A, D. Middle part: B, C. (S, L, T in the back)

Ditizgen Polymath Multiplex

I bought this slide rule in Pomona several months ago for $7. Unfortunately, the case that it came in crumbled. It now has a towel as a case.

Scales:
Front: LL01, K, A, CF, CIF, L, CI, C, D, DI, LL1
Back: LL02, LL03, DF, B, T<45°, T>45°, ST, S, D, LL3, LL2

Keuffel & Esser Co. 4181-3

My dad and I went to the swap meet at Glendale College this morning. Pretty good swap meet despite it being on the small side. A lot of high-end stuff. I got this slide rule for $7.

Slides:
Front: LL02, LL03, DF, CF, CIF, CI, C, LL3, LL2
Back: LL01, L, K, A, B, T, ST, S, D, DI, LL1


I like to work with slide rules every once in a while - fun!

Eddie

This blog is property of Edward Shore. 2013

Thursday, April 18, 2013

HP 39gii Programming Tutorial Update

There will be a Part 8 of the HP 39gii calculator tutorial series. I plan to have it posted by next week.

Part 8 will involve programs that use functions and equations as parameters.

Hope everything is well. It is a crazy world out there!


Eddie


This blog is property of Edward Shore. 2013

Saturday, April 13, 2013

The Weekend's Here: A preview of what's coming next.

Hi everyone! I am at a local Starbucks. Love the coffee shop atmosphere - and coffee.

Way I doing today and over the next few weeks is taking some programs from the classic Hewlett Packard manuals, particularly the 1970s (25, 45, 67, 33E, etc) and programming them on today's calculators (35S, 39gii, 15c LE, 50g). I expect that I will end up using resources from Texas Instruments and Casio as well. I aim to post some programs on my blog starting in May.

Have a great and fun weekend! Thank you for your continual support and comments!

Eddie


This blog is property of Edward Shore. 2013

Tuesday, April 9, 2013

TI-84 Plus C Silver Edition Review

TI-84 Plus Color Silver Edition Review

The changes are mostly positive as TI takes another step forward while maintaining the classic system TI-84+ users are accustomed to.

The good:

No steep learning curve from older 82/83/84 models - just a few more additional commands, mainly revolving around color. You can pretty much pick the TI-84+ CSE up and operate it like any other version of the 82/83/84.

15 colors to work with in graphing and drawing.

Rechargeable batteries - and they are much better than TI nSpire CX's. A charge can last a week or better pending on regular use, a day on heavy use (like plotting every point on the graph screen), charges to full quickly.

Backlit screen

Current mode settings are now on top of the screen at all times.

Up to 10 pictures can are stored in archive memory and still be recalled without having to take up RAM.

The not so good:

Decrease in RAM for 24,000 bytes to 21,000 bytes. This really does not affect you unless you do a lot of programming (like me). We still have a TON of archive ROM to store programs away if you don't plan on using them for a while.

Native trig functions still do not support complex numbers.

Graph screen does not take the whole screen - there is a border.

Graphing equations is slightly slower than its predecessors; however it is not a deal breaker.

Price: around $130, depending on vendor. I got mine for $129. Will the TI-84+ CSE replace the monochrome TI-84+ Silver Edition when the color edition hits the mainstream? I do not know.

Worth buying, especially if
(1) you have not purchased an 84+ before,
(2) am a TI and/or calculator enthusiast, or
(3) want a color calculator with a classic operating structure.

Overall, I enjoy using this calculator.

I leave you with this tip and some screen shots.

Tip: Run programs in Classic mode, they run faster than programs ran in MathPrint mode. This is for any TI-84+ models.

Have a great day! Eddie


This blog is property of Edward Shore. 2013


Monday, April 8, 2013

Using Color Calculators to Plot Patterns (TI-84+CSE, Casio Prizm)

We are in the age of color graphing calculators (and mobile apps). While the Casio Prizm and TI nSpire CX (with and without CAS) got the age started, it could be the next crop of color calculators, such as the TI-84+ Color Silver Edition that puts color into the mainstream.

These patterns are generated by using four colors and a function f(x,y) where

f(x,y) = remainder( int(Φ(x,y)) / 4)

with Φ(x,y) is a positive function. The value of f(x,y) determines on of four colors. I used the DRAWPATTERN (page 269 of the HP 39gii manual, 1st edition) as a template.

With the TI-84+ Color Silver Edition it takes about 40-45 minutes to complete. The real surprise (to me at least), was I did one with the Casio Prizm, which it took about six hours to complete; I was surprised there was any battery left. This is where the advantage of rechargeable battery of the TI-84+ CSE comes in. I am happy then to report that the battery of the TI-84+ CSE held up well.

Without any further ado, here are the graphics created! Nice way to spend a Sunday afternoon, I think.

With each picture I will list Φ(x,y). The window, except noted, is Xmin=-10, Xmax=10, Ymin=-10, Ymax=10.

Recall: f(x,y) = remainder( int(Φ(x,y)) / 4)

Until next time,

Eddie


This blog is property of Edward Shore. 2013


Friday, April 5, 2013

HP 39gii Programming Part 7: Using App Specific Commands

I hope you are all enjoying the day/night so far. The subject of Part 7 of the HP 39gii will be App-Specific commands.

We will work with app and global variables, as well as switching applications and doing App specific commands to our advantage. The two primary commands we will work with are STARTAPP and STARTVIEW.

STARTAPP and STARTVIEW

STARTAPP does what it advertises: starts the specific application called. The required application is stated as a string. For example, STARTAPP("Function") starts the Function graphing app. Running this command is key if you want the user to access specific screens, such as the Symbolic, Plot, and Numeric screens.

Keyboard sequence for STARTAPP is: [Shift] [Math] [ F1 ] [ 1 ] [ 2 ].

Applications include:

"Function" - Function Graphing
"Parametric" - Parametric Graphing
"Polar" - Polar Graphing
"Sequence" - Recurring Sequence Graphing
"Solve" - Solver Interface
"Triangle Solver" - Application for solving sides and angles of triangles
"Finance" - Time Value of Money Application
"Statistics 1Var" - 1 Variable Statistics
"Statistics 2Var" - 2 Variable Statistics
"Inference" - Hypothetical Testing and Confidence Intervals
"Linear Explorer" - Teaching application regarding linear equations
"Quadratic Explorer" - Teaching application regarding quadratic equations
"Trig Explorer" - Teaching application regarding trigonometric functions
"Data Streamer" - Application that works with Hewlett Packard's StreamSmart devices (data collection from various apparatus)

STARTVIEW leaves the user at a specific view, such as the Home screen, Plot screen, etc. Each screen has a specific view code, with syntax STARTVIEW(code). Some view codes are:

0: Symbolic Screen
1: Plot Screen
2: Numeric Screen
3: Symbolic Setup Screen
4: Plot Setup
5: Numeric Setup
6: App Information (accessed by [Shift] [Apps])
7: Views Key (same as if you pressed the [Views])

-1: Home Screen
-2: Mode Setup Screen

Keyboard sequence for STARTVIEW is: [Shift] [Math] [ F1 ] [ 1 ] [ 3 ].

App Variables

App variables are global. Some are specific to one app while others are applicable to several apps. I usually type of the variables, but you can find the app variables by pressing [Vars] [ F2 ]. The order of the apps shift, with the current app on top. I will present some app variables. This is not the extensive list by any means, so please check out the HP 39gii manual for a complete list.

App Variables Specific to One App

Function Symbolic - There are ten functions that are named F#, with # representing a digit 0 through 9. F1 is at top of the Symbolic view, F0 is at the bottom.

Parametric Symbolic - Similar to Function; names are X1 - X9, X0 and Y1 - Y9, Y0.

Polar Symbolic - Similar to Function; names are R1 - R9, R0

Sequential Symbolic - Similar to Function; names are U1 - U9, U0

Solve Symbolic - you can store ten equations in the solve variables E1 - E9, E0

You can store graphing expressions and equations to the appropriate variable by using a string around your expression/equation. You can use both methods of storing (store arrow and the equals-colon assignment syntax) Examples:

"SIN(X^2)" → F1 (store to Function F1)
E3 := "A^2 + B^2 = C^2" (store to Equation E3)

Statistics - 1 Variable:
Data: D1 - D9, D0 (lists)
Analysis: H1 - H5
Set the sample by the command SetSample(H#, D#);

Statistics - 2 Variable:
Data: C1 - C9, C0 (lists)
Analysis: S1 - S5
Set the data to be analyzed by the commands:
SetIndep(S#, C#);
SetDepend(S#, C#);

App Variables used by Several Apps

The Plot window: Xmin, Xmax, Ymin, Ymax, Xscl, Yscl, Tmin, Tmax, Tstep, θmin, θmax, θstep

Three ways to access θ:
1. Be in Polar mode and press [X,T,θ,N].
2. Echo θ from the Characters Menu: [Shift] [Vars] [ F2 ] [ 7 ] (Greek and Coptic) [ F4 ] (Page Down) [ left ] [ left ] [ up ] [ up ] [ F6 ] (OK)
3. char(952) returns "θ" while expr(char(952)) returns θ.

CHECK and UNCHECK

CHECK turns a certain equation/expression on. UNCHECK, as you probably guessed, turns named function off.

Syntax:
CHECK(n)
UNCHECK(n)

Just the number is accepted: n refers to the equation/expression listed in the current app. Despite what the manual says, CHECK (F1) produces an error, n must be numerical.

With that long intro done, let's get to the programming!

The Program SSAT (Simple Statistics)

SSAT takes a list, turns on the Statistics 1-Variable app, and returns:

* The number of elements in the list
* The mean
* The standard deviation

After the results are displayed, you are returned to the home screen.

Note: The commands SetSample and Do1VStats are found in then Command-App-Statistics 1 Variable menu. ([Shift] [Math] [ F2 ])

Program:
EXPORT SSTAT(D)
BEGIN
D1:=D;
STARTAPP("Statistics 1Var");
SetSample(H1,D1);
Do1VStats(H1);
PRINT();
PRINT("n="+Nbltem);
PRINT("Mean="+MeanX);
PRINT("SDev="+sX);
STARTVIEW(-1);
END;


Example:
SSTAT({3,4.5,4.4,4.6,4,3.9,3.8,3,3.2}) returns

n=9
Mean=3.822222222
SDev=.630035272381

The Program PLOTF

The program PLOTF takes three arguments.

PLOTF(function of X as a string, left limit, right limit)

The function F0 is turned on while the other functions F1 - F9 are turned off. The Function app is tuned on the program terminates at the plot screen.

Program:
EXPORT PLOTF(f,a,b)
BEGIN
LOCAL c,d,K;
STARTAPP("Function");
Xmin:=a;
Xmax:=b;
c:=0;
d:=0;
f → F0(X);
CHECK(0);
FOR K FROM 1 TO 9 DO
UNCHECK(K);
END;
FOR K FROM a TO b STEP (b-a)/256 DO
IF F0(K) < c THEN
c:=F0(K); END;
IF F0(K) > d THEN
d:=F0(K); END;
END;
Ymin:=c-1;
Ymax:=d+1;
Xtick:=10^(ROUND(LOG(b-a),0));
Ytick:=10^(ROUND(LOG(d-c),0));
STARTVIEW(1);
END;


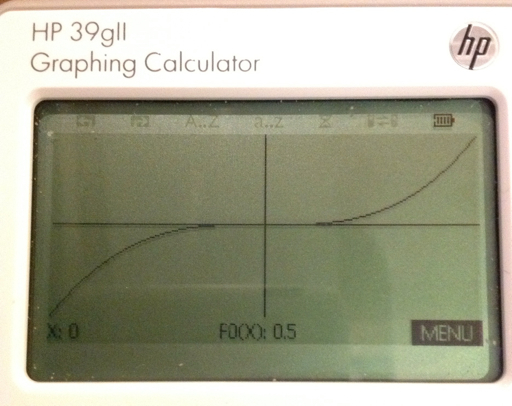
Example: Plot y = 2x^3 - x + 0.5 from -5 ≤ x ≤ 5

PLOTF("2X^3-X+0.5",-5,5) gets this:

The Program PROJECTILE

PROJECTILE does the following:
1. Switch the 39gii to the Parametric app and Degrees mode
2. Determines the projectile's range and height. No air resistance is assumed. You determined whether you are working in: SI (meters) or US (feet).
3. The path of the projectile is graphed.


Input: PROJECTILE(initial height, initial velocity, initial angle in degrees)

The program will ask you to select the value of the gravitational constant:
g = 9.80665 m/s^2
Or
g = 32.17405 ft/s^2

Program:
EXPORT PROJECTILE(y0, v0, a0)
BEGIN
LOCAL K;
STARTAPP("Parametric");
CHOOSE(K,"g=","9.80665 m/s²","32.17405 ft/s²");
IF K==0 THEN KILL; END;
IF K==1 THEN G:=9.80665; END;
IF K==2 THEN G:=32.17405; END;
HAngle:=1;
I:=y0;
V:=v0;
A:=a0;
"V*COS(A)*T" → X0(T);
"I+V*SIN(A)*T-0.5*G*T²"→Y0(T);
CHECK(0);
FOR K FROM 1 TO 9 DO
UNCHECK(K); END;
W:=FNROOT(Y0(T)=0,T,10);
R:=X0(W);
S:=FNROOT(X0(T)=R,T,10);
H:=(V²*(SIN(A))²)/(2G);
Xmin:=0;
Xmax:=R+2;
Ymin:=-1;
Ymax:=H+2+I;
Tmin:=0;
Tmax:=S;
Tstep:=S/240;
MSGBOX("Range: "+R);
MSGBOX("Height: "+H);
STARTVIEW(1);
END;


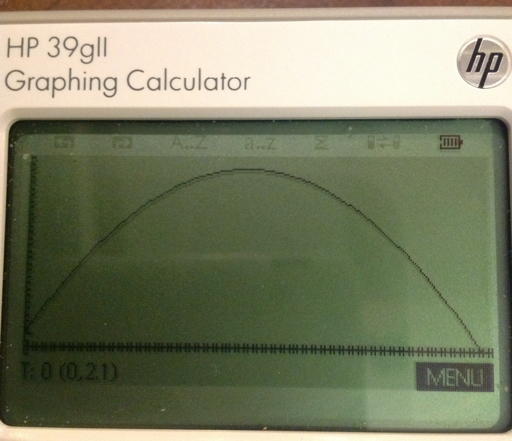
Example:

Initial height=2.1 ft
Initial velocity=56.5 ft/s
Initial angle=46.76°

PROJECTILE(2.1,56.5,46.7), select g=32.17405 ft/s^2

Results: (in feet)
Range: 100.984422673
Height: 26.2756069802

This concludes Part 7 of the HP 39gii programming tutorial. Until next time,

Eddie

Have a great day! Much happiness!


This blog is property of Edward Shore. 2013

Monday, April 1, 2013

HP 39gii Programming Tutorial Part 6: Making programs interactive with GETKEY

Welcome to Part 6 of the HP 39gii programming tutorial. In today's session, it is all about GETKEY. The GETKEY command allows programs to be interactive during execution.

GETKEY and Key Codes

Keystroke sequence for GETKEY:
[SHIFT] [Math] [ F1 ] [ 5 ] [ 5 ]

GETKEY returns the key number of the last key pressed. If there has not been a key pressed, GETKEY returns -1.

GETKEY assigns a key code to each of the keys, starting with 1 on the upper left corner of the keyboard, the [ F1 ], going right then down, to the lower right corner of the keyboard, [ENTER], which has code 50.

The key codes for the arrow keys are as follows:
[ up ] : 9
[ right ] : 10
[ left ] : 14
[ right ] : 15

Below is the map of key codes. (Source: HP 39gii User's Guide, Edition 1)

How to use GETKEY

In today's tutorial, we will demonstrate two uses of GETKEY:

1. Execute commands until any key is pressed.

General structure:
WHILE GETKEY==-1 DO
(Commands)
END;

2. Assign certain actions to certain keys.

Let E be the code for the exit key. Press the key that has the corresponding code E, and the loop ends.

REPEAT
...
GETKEY:=K;
....
IF K==(number) (and/or other conditions) THEN
(do this); END;
...
UNTIL K==E;

Let's demonstrate this in a couple of programs.

The Program SPIN1

Spinning Game #1: Use GETKEY to repeat an action until a key (any key is pressed)

Three spinners spin between 0 and 4. Press any key at any time and try to get the highest score possible.

EXPORT SPIN1()
BEGIN
RANDSEED();
RECT();
TEXTOUT_P("Ready!",1,1);
WAIT(0.5);
WHILE GETKEY==-1 DO
RECT();
INT(RANDOM(0,5))→A;
INT(RANDOM(0,5))→B;
INT(RANDOM(0,5))→C;
TEXTOUT_P(string(A),60,53);
TEXTOUT_P(string(B),145,53);
TEXTOUT_P(string(C),230,53);
WAIT(0.25);
END;
A+B+C→S;
TEXTOUT_P("Your score is "+string(S)+".",1,73);
WAIT(0);
END;


The MOVEM Program

The program MOVEM uses GETKEY to make an interactive program. Use the arrow keys to move the "M" character around. Exit the program with by pressing the [ F6 ] key.

The characters of the large font has a size of 10 x 12 pixels.

To erase a character at a position, use
TEXTOUT_P(character, x, y, font size, 3)

The last 3 tells the 39gii to type the character in white. This is necessary to give the "M" movement in MOVEM.

EXPORT MOVEM()
BEGIN
RECT();
A:=100;
B:=60;
REPEAT
TEXTOUT_P("M",A,B,2);
K:=GETKEY;
IF K≠1 THEN
TEXTOUT_P("M",A,B,2,3);
END;
IF K==14 AND A>0 THEN
A:=A-10; END;
IF K==10 AND A<240 THEN
A:=A+10; END;
IF K==15 AND B<108 THEN
B:=B+12; END;
IF K==9 AND B>0 THEN
B:=B-12; END;
UNTIL K==5;
END;


The screen shot below shows MOVEM in action. The can be a base for a simple game.

Next time, in Part 7, we'll show you how to use App commands in a program.

This blog is property of Edward Shore. 2013

TI-84+ Color Silver Edition vs Casio Prizm Color Command Comparison


Hello everyone! Is it April already? I could swear 2013 just started.

This is just a comparison between two graphing calculators: TI-84+ Color Silver Edition (TI-84+ CSE) vs Casio Prizm (fx-CG 10/20) Color Command Comparison. I own one of both models (no joke!) and enjoy using them. But it's fun to compare the two - even if it is out of pure curiosity.

Year of first release:
Casio Prizm: 2011
TI-84+ CSE: 2013

Colors Available:

Casio Prizm, 8 colors: Black, Blue, Red, Magenta, Green, Cyan, Yellow, White

TI-84+ CSE, 15 colors: Blue, Red, Black, Magenta, Green, Orange, Brown, Navy, Light Blue, Yellow, White, Light Gray, Medium Gray, Gray, Dark Gray

How to access the colors:
Casio Prizm: [SHIFT] [ 5 ] (FORMAT)
TI-84+ CSE: Either the last sub-menu of the VARS menu or if you are in program editing mode, the third sub-menu of the PRGM menu

Here are some of the programming commands that use color:

Output Text - Terminal/Home Screen:
Casio Prizm:
color "Text" (◢ if desired)
color Locate row, col, "text"

TI-84+CSE:
N/A

Text on the Graph Screen:
Casio Prizm: 187 × 379
color Text row, column, "text"/expression

TI-84+ CSE: 265 × 165
TextColor(color)
Text(row, column, "text"/expression)

Drawing Lines: (Points)
Casio Prizm:
Plot/Line-Color color
FLine x1, y1, x2, y2

TI-84+ CSE
Line(x1,y1,x2,y2,color)

Drawing Circles: point (x,y) with radius r
Casio Prizm:
color Circle x,y,r

TI-84+ CSE:
Circle(x,y,r,color)

Plotting Functions
Casio Prizm:
"f(X)"→Y# (Y from the VARS GRAPH menu)
Set-G Color color, #
DrawGraph

TI-84+ CSE:
"f(X)" → Y# (Y from the VARS Y-VARS menu)
GraphColor(#, color)
DispGraph


Happy programming and graphing!


Eddie


This blog is property of Edward Shore. 2013

Friday, March 29, 2013

HP 39gii Programming Tutorial - Part 5: Pixels and Graphics

Welcome everyone to Part 5 of my HP 39gii programming tutorial.

We are going to work with some graphic commands with the HP 39gii.

The Screen

When it comes to graphics, the HP 39gii has two systems: points and pixels.

Points refers to Cartesian points. Points work just as you would expect: x increases as you go right, y increases as you go up. The boundary of the screen are controlled by the value of Xmin, Xmax, Ymin, and Ymax.

Pixels refer to the LCD terminal screen. Unless you are working with the Plot screen, you are most likely going to work with the LCD terminal screen. In the pixel system, each coordinate is fixed. The 39gii screen is 255 pixels by 126 pixels. In the pixel system, the upper left hand coordinate is (0,0), and the bottom right hand corner is (254,125). The x coordinate increases as you go to the right, but the y coordinate increases as you go down. A row of (about) 14 pixels is reserved for the soft key menus (F1 - F6). In practice you would deal a screen of size 255 × 111.

We will work with the Pixel system in this part of the tutorial.

Common Drawing Commands

In a program, you will want to erase the drawing screen, and at the end, you will need a "hold" command.

Erasing the screen is pretty simple. Whenever you want to erase the LCD screen, type RECT();.

The "hold" command freezes the screen together to show you the picture. Without the "hold" command the calculator just returns to the Home screen. Two "hold" commands are WAIT(0) and FREEZE. I prefer WAIT(0) because the program continues with the press of any key and it works as expected.

Some of the common drawing commands are:

Erase the drawing screen:

RECT();


Key Sequence:
[SHIFT] [Math] [ F1 ] [ 4 ] [ ) ]

To put text anywhere on the screen, starting from pixel (x,y):

TEXTOUT_P(string,x,y);


Key Sequence:
[SHIFT] [Math] [ F1 ] [ 4 ] [ up ] [ENTER]

To draw a line segment from pixel (x1, y1) to (x2, y2):

LINE_P(x1,y1,x2,y2);


Key Sequence:
[SHIFT] [Math] [ F1 ] [ 4 ] [ LN ]

To draw a white box with black border, given opposite corner pixels (x1, y1) and (x2, y2):

RECT_P(x1,y1,x2,y2,0,3);


Key Sequence:
[SHIFT] [Math] [ F1 ] [ 4 ] [ ÷ ]

To draw a circle with center pixel (x,y) and radius of r pixels:

ARC_P(x,y,r);


Key Sequence:
[SHIFT] [Math] [ F1 ] [ 4 ] [ 2 ]

To draw an arc between angle A and B:

ARC_P(x,y,r,A,B);


Key Sequence:
[SHIFT] [Math] [ F1 ] [ 4 ] [ 2 ]

To turn the pixel (x,y) on:

PIXON_P(x,y);


Key Sequence:
[SHIFT] [Math] [ F1 ] [ 4 ] [ ( ]

To turn the pixel (x,y) off:

PIXOFF_P(x,y);


Key Sequence:
[SHIFT] [Math] [ F1 ] [ 4 ] [ x² ]

Colors (Really Grayscale) on the 39gii

The 39gii has four grayscale shades. Each have the following values:
0 = black
1 = dark gray
2 = light gray
3 = white

You can use color in the following commands. The color arguments are always optional.

RECT_P(x1,y1,x2,y2,edge color,fill color);
LINE_P(x1,y1,x2,y2,color);
PIXON_P(x,y,color);
ARC_P(x,y,r,A,B,color);


Fonts with the 39gii

The HP 39gii has two fonts: large and small. They have the following values:
0 (or left out) = default, whatever the system setting is
1 = force small font
2 = force large font

The syntax of TEXTOUT_P with font size is:
TEXTOUT_P(string,x,y,font size);

Let's use these commands in some programs.

The Program RTEXT

RTEXT(desired string, number of places)

RTEXT places a desired string all over the screen at random.


EXPORT RTEXT(str1,times)
LOCAL X,Y,K;
RECT();
RANDSEED(RANDOM);
FOR K FROM 1 TO times DO
X:=INT(RANDOM(1,254));
Y:=INT(RANDOM(1,111));
TEXTOUT_P(str1,X,Y);
END;
WAIT(0);
END;


Example: Sprinkle "39gii" in 75 random places. From the Home screen type RTEXT("39gii",75). You get something like this:

The Program BOXLH

The program BOXLH draws a box of length L and height H. The box grows from the center pixel (127, 56). Input: BOXLH(L,H)


EXPORT BOXLH(L,H)
BEGIN
RECT();
RECT_P(127-L/2,56-H/2,127+L/2,56+H/2,0,3);
WAIT(0);
END;


Example:
Draw a box with length of 60 pixels and height of 56 pixels. From the home screen type BOX(60,56).

The Program BOX3D

BOX3D takes the box drawing program one step further, by adding some depth to make the box look three-dimensional.

Input: BOX3D(L,H,D,A)
L = length of the box in pixels
H = height of the box in pixels
D = depth of the box in pixels
A = tilt angle in degrees

BOX3D sets the angle mode to Degrees. (HAngle = 0).

EXPORT BOX3D(L,H,D,A)
BEGIN
LOCAL X,Y,Z,T,C,S;
HAngle:=1;
RECT();
X:=127-L/2;
Y:=127+L/2;
Z:=56-H/2;
T:=56+H/2;
RECT_P(X,Z,Y,T,0,3);
C:=D*SIN(A);
S:=D*COS(A);
RECT_P(X+C,Z-S,Y+C,T-S,0,3);
LINE_P(X,Z,X+C,Z-S);
LINE_P(Y,Z,X+C,Z-S);
LINE_P(X,T,X+C,T-S);
LINE_P(Y,T,Y+C,T-S);
WAIT(0);
END;


Note: The order of the drawing commands is important, especially when it comes to the RECT and RECT_P commands.

Example: Length of 45 pixels, height of 27 pixels, depth of 33 pixels, at an angle of 45°
Enter BOX3D(45,27,33,45)

A Short Animation: The Program GROWTH

GROWTH is a program of an arc that grows by π/6 (30°) every second until a circle is completed. Radians angle mode (HAngle=1) is set in this program.


EXPORT GROWTH()
BEGIN
RECT();
HAngle:=0;
FOR K FROM 0 TO 2π STEP π/6 DO
ARC_P(127,56,30,0,K);
WAIT(1);
END;
TEXTOUT_P("Done",0,0);
WAIT(0);
END;

CDEMO: Colors and Fonts

CDEMO shows the three colors and the small font. You can cut down on the lines needed by using a clever mathematical equation and a well set up FOR loop.


EXPORT CDEMO()
BEGIN
LOCAL K;
RECT();
FOR K FROM 1 TO 3 DO
RECT_P(100,30*K,200,30*K+25,0,K);
END;
TEXTOUT_P("Dark Gray",1,35,1);
TEXTOUT_P("Light Gray",1,65,1);
TEXTOUT_P("White",1,95,1);
TEXTOUT_P("39gII Colors",50,1,2);
WAIT(0);
END;

Well, I hope these five programs demonstrate what you can do with the graphing commands with the 39gii. As always, I hope encourages you to program and to try things out!

In Part 6, we are going interactive!

Until next time,

Eddie


This blog is property of Edward Shore. 2013


Saturday, March 23, 2013

Spring has Sprung: Pocket Ref, TI-30XA, Old HP Manuals, Review and more HP 39gii is coming


Hi everyone! Greetings from the Starbucks in Azusa, CA. Today's blog entry is a hodgepodge. Part 5 of the HP 39gii Programming tutorial - I am planning to have that ready by next week; totally apologize for the long delay.

I am very thankful my family is doing fine and my dad and uncle are both home from the hospital.

Pocket Ref: A Book of Everything?

While at Harbor Freight I found this book: "Pocket Ref 4th Edition" compiled by Thomas J. Glover; picked it up for $10. This reference edition has practically everything technical: physics, computer, mechanics, construction, automotive equations, electrical engineering equations, table of elements and chemical molecules, weights, densities, and perpetual calendars; just to name a few topics. This book has become a permanent part of things I take everywhere. Hopefully this reference will be used for future blog entries.

The TI-30XA: Then and Now

I finally broke down and got a new version of the TI-30XA by Texas Instruments. I have been resisting it for so long since I preferred the solar version over the battery version. What got me to finally purchase it is the article I saw on www.datamath.org, which details the logarithm bug.

Basically, the calculation goes haywire for:

(1) ln(1+x) when x is really small, and

(2) (1+1/n)^n for really large n.

I tested both calculations for the calculators. I also used the built in calculator in the google.com search engine. If you type in a mathematical calculation in google, it will get you the answer! Google also handles conversions and graphing functions.

Both the TI-30XAs (solar and battery) returned the same answers, so nothing has changed in the algorithm.

(1) ln(1 + x)

x=10^-2
TI-30XA: 0.009950331
Google: 0.00995033085

x=10^-8
TI-30XA: 0.000000001
Google: about 9.9 x 10^-9

(2) (1+1/n)^n

n = 10^2
TI-30XA: 2.70481383
Google: 2.70481382942

n = 10^8
TI-30XA: 2.7183727
Google: 2.7182817935


Out of curiosity, the TI-84+ agrees with Google. So this is a cautionary tale with the TI-30XA: be careful with arguments involving 1+x, where x is real small (like powers of 10^-6 or smaller) in any calculations involving logarithms and powers.

On the plus side, the battery TI-30XA retains memory when the ON button is pressed and the numbers are larger and in bold.

Review of the TI-84+ Color Silver Edition Coming Soon

Speaking of Texas Instruments calculators, my TI-84+ C Silver Edition is going to arrive at my doorstep in the coming week. That was my birthday present to myself. By clicking in this sentence, you can read how I initially felt about the TI-84+ CSE. I did read good reviews about it (This sentence is a link to one review, done by Christopher Mitchell (Cemetech). )and will give an impression when I actually have a TI-84+ CSE in my hands.

Old Hewlett Packard Manuals: They have a calculation manual for everything!

Back in the 1970s and 1980s, when pocket calculators were in their beginning stages, Hewlett Packard released detailed calculator manuals for not only their products (HP 35, HP 45, HP 67, etc), they had manuals covering almost every topic conceivable. To name a few: engineering, finance, games, biology, and one even covered astrology. Every now and then I like to study some of these manuals and try to see if I can do it (mostly with today's calculators). It is a really fun way to pass the time.

Several years ago, I ordered the DVD that contains a collection of manuals from The Museum of HP Calculators. You can order the DVD by clicking on this link.. The link will contain another link of the manuals the DVDs contain. I hope to refer to these manuals in future blog entries.

So, more HP 39gii Programming Tutorial, a review of the TI-84+ CSE, and more is coming. Thank you as always and take care,

Eddie


This blog is property of Edward Shore. 2013


Monday, March 18, 2013

HP 39gii Programming Part 4: REPEAT and WHILE

Welcome to Part 4 of the HP 39gii Programming Tutorial. Here is what is on the menu tonight:

Table of Contents:
1. REPEAT structure
2. WHILE structure
3. Some Notes
4. The Program EUCLID
5. The Program RSUM1
6. The Program SQFACTOR

This lesson covers the REPEAT and WHILE loops. Each loop repeats a set of instructions indefinitely until a condition is met.


1. The REPEAT Structure

REPEAT
these instructions;
UNTIL this condition is true;


The REPEAT loop executes the set of commands then it tests the condition. Hence in a REPEAT loop, the commands are always executed at least once.

Keystrokes to find the template: In the program editor press [ F6 ] (TMPLT) [ 4 ] [ 4 ]


2. The WHILE Structure

WHILE this condition is true DO
these instructions;
END;


The WHILE loop tests the condition before executing the set of commands. It is possible that the commands in a WHILE loop are never executed.

Keystrokes to find the template: In the program editor press [ F6 ] (TMPLT) [ 4 ] [ 3 ]


3. Some Notes

Loops (FOR, WHILE, REPEAT) can be nested That is, loops can contain other loops. The is demonstrated in the SQFACTOR program, and will be demonstrated in future programs.

PRINT does not need the string command - expressions will evaluate automatically. This will allow to combine strings and mathematical expressions quickly with just the use of the plus sign (+) and the quotation marks (" "). MSGBOX makes everything in its argument a string, so it is best to use the string command. The program listed below demonstrates the difference.

EXPORT TEST814()
BEGIN
MSGBOX("TEST" + 300 + 16);
PRINT(15*20+4² + " IS THE DATE");
END;


4. The Program EUCLID

The goal of EUCLID is to use the Euclidean algorithm to find the greatest common divisor of two integers. The integers can be entered in any order. EUCLID takes the two integers as pass-through arguments.

The program EUCLID
EXPORT EUCLID(X,Y)
BEGIN
LOCAL M,N,R,A;
PRINT();
N:=MAX(X,Y);
M:=MIN(X,Y);
REPEAT
A:=INT(N/M);
R:=N - A*M;
PRINT(A + "*" + M + "+" + R);
WAIT(1);
N:=M;
M:=R;
UNTIL R==0;
RETURN N;
END;


The integer is split into its integer of the quotient, A, and remainder, R, as such:

N = A * M + R

The program repeats until R=0.

Examples:
EUCLID(145,54) → 1
EUCLID(136,72) → 8 (we have a picture of this example)


5. The Program RSUM1

The program RSUM1 builds a sum of random numbers between 0 and 1 while the total sum is less than 1. RSUM1 takes no arguments.

The Program RSUM1

EXPORT RSUM1()
BEGIN
LOCAL S;
S:=0;
WHILE S<1 DO
S:=S+RANDOM;
END;
RETURN S;
END;


You can find the RANDOM command in the Math-Probability menu ([Math] [Math] [ 4 ]). To generate random numbers between 0 and 1, either RANDOM or RANDOM() is acceptable.

Example sums you may get with RSUM1 are 1.29441419992, 1.28901948188, and 1.57880668903.


6. The program SQFACTOR

The program SQFACTOR simplifies √N where N is an integer (i.e. √180 = 6 √5, √364 = 2 √91). It has one pass-through argument, N.

I am going to use the store arrow (STO>) accessed by the [ F1 ] key in the program editor. The store arrow is a thick dark arrow pointing to the right (▸). You can use the := assignment if you wish.

SQFACTOR(N)
EXPORT SQFACTOR(N)
BEGIN
LOCAL C,K;
1 ▸ C;
2 ▸ K;
WHILE K² < N DO
WHILE FRAC(N/K²) == 0 DO
N/K² ▸ N;
C*K ▸ C;
END;
K+1 ▸ K;
END;
RETURN string(C)+"√"+string(N);
END;


Examples:
SQFACTOR(180) returns "6 √ 5"
SQFACTOR(77) returns "1 √ 77"
SQFACTOR(400) returns "4 √ 25"

OK The last one should be 20. However 4 √25 = 4 × 5 = 20. So this isn't perfect.

Challenge: can this be improved? I will leave this for the readers.


That is it for Part 4. Next time, we will cover basic graphics commands. Take care and have fun!

Eddie

This blog is property of Edward Shore. 2013

Saturday, March 16, 2013

Decimal/Binary Conversions for the HP 39gii


Decimal and Binary Conversions
Programs created 2/20/2013

Decimal to Binary (number → string)

D2B(number) - execute from Home!


EXPORT D2B(N)
BEGIN
LOCAL str1;
D:=INT(N);
L:=INT(LN(D)/LN(2));
str1:="1";
D:=D-2^L;
FOR K FROM 1 TO L DO
IF 2^(L-K)≤D THEN
str1:=str1+"1";
D:=D-2^(L-K);
ELSE
str1:=str1+"0";
END;
END;
RETURN str1;
END;


Examples:

D2B(52) returns "110100"

D2B(131) returns "10000011"

Binary to Decimal (string → number)

Run this from Home! B2D(string of 1s and 0s). Attempting to run B2D from the program catalog will cause an error.

EXPORT B2D(str1)
BEGIN
D:=dim(str1);
N:=0;
FOR K FROM 0 TO D-1 DO
N:=N+2^K*expr(mid(str1,D-K,1));
END;
RETURN N;
END;


Examples:

B2D("11011") returns 27.

B2D("1010110000") returns 688.


Eddie


This blog is property of Edward Shore. 2013


Casio fx-50F/Radio Shack EC-4024 Program Collection: October 2026

Casio fx-50F/Radio Shack EC-4024 Program Collection: October 2026 Notes: * The fx-50F/EC-4024 has a 29 step program space betwe...