Showing posts with label angles. Show all posts

Saturday, May 9, 2026

Solving Simple Arcsine and Arccosine Equations

 Solving Simple Arcsine and Arccosine Equations


Angle Measure

This document will focus on angle measurement in degrees. For radians and grads, please use the appropriate measurement.


90° = π/2 rad = 100 grad

180° = π rad = 200 grad


Simple Arcsine Equations


The calculator arcsine function gives: Domain: -1 ≤ x ≤ 1, Range: -90° ≤ Θ ≤ 90°


Note that for any angle x: sin(180° - x) = sin(x), sin(x) = sin(x ± 360°*z) (z is an integer)


Given n, solve for Θ:

n = sin(Θ) = sin(180° - Θ)


Base Solution 1:

n = sin(Θ)

⇒ Θ = arcsin(n)


Base Solution 2:

n = sin(180° - Θ)

arcsin(n) = 180° - Θ

⇒ Θ = 180° - arcsin(n)


Example:

0.67 = sin(Θ)

Base Solution 1: Θ = arcsin(0.67) ≈ 42.0670648025°

Base Solution 2: Θ = 180° - arcsin(0.67) ≈ 137.932935198°


Given n and α, solve for Θ:

n = sin(α + Θ)


Base Solution 1:

n = sin(α + Θ)

arcsin(n) = α + Θ

⇒ Θ = arcsin(n) – α


Base Solution 2:

n = sin(180° - (α + Θ))

n = sin(180° - α – Θ)

arcsin(n) = 180° - α – Θ

⇒ Θ = 180° - α – arcsin(n)


Example:

0.7757 = sin(Θ + 76°)

Base Solution 1: Θ = arcsin(0.7757) – 76° ≈ -25.1314549842°

Base Solution 2: Θ = 180° - 76° - arcsin(0.7757) = 104° - arcsin(0.7757) ≈ 53.131459842°


To get all the possible angles, add and subtract multiples of 360°.


Solving Simple Arccosine Equations


The calculator arccosine function gives: Domain: -1 ≤ x ≤ 1, Range: -90° ≤ Θ ≤ 90°


Note that for any angle x: cos(180° - x) = -cos(x), cos(x) = cos(x ± 360°*z) (z is an integer)


Given n, solve for Θ:

n = cos(Θ), n = cos(-Θ)


Base Solution 1:

n = cos(Θ)

⇒ Θ = arccos(n)


Base Solution 2:

n = cos(-Θ)

⇒ Θ = -arccos(n)


Example:

0.58 = cos(Θ)

Base Solution 1: Θ = arccos(0.58) ≈ 54.54945736°

Base Solution 2: Θ = -arccos(0.58) ≈ -54.54945736°


Given n and α, solve for Θ:

n = cos(α + Θ)


Base Solution 1:

n = cos(α + Θ)

arccos(n) = α + Θ

⇒ Θ = arccos(n) – α


Base Solution 2:

n = cos(-(α + Θ))

n = cos(-α – Θ)

arccos(n) = -α – Θ

-arccos(n) = α + Θ

⇒ Θ = -arccos(n) – α


Example:

0.6 = cos(35° + Θ)

Base Solution 1: Θ = arccos(0.6) – 35° ≈ 18.13012035°

Base Solution 2: Θ = -arccos(0.6) – 35° ≈ -88.13010235°


To get all the possible angles, add and subtract multiples of 360°.


I hope you find this useful and helpful,


Eddie


All original content copyright, © 2011-2026. Edward Shore. Unauthorized use and/or unauthorized distribution for commercial purposes without express and written permission from the author is strictly prohibited. This blog entry may be distributed for noncommercial purposes, provided that full credit is given to the author.


Saturday, April 20, 2024

Sharp EL-9300 Programs

Sharp EL-9300 Programs


Today’s blog entry takes us to the 1992 Sharp’s EL-9300 graphing calculator. On January 10, 2022, I gave a review of this calculator:

https://edspi31415.blogspot.com/2022/01/retro-review-sharp-el-9300c.html


The programs should also work on the EL-9200. Spaces are added for readability.


Sharp EL-9300 Program: polygon2


The program polygon2 calculates four properties of regular polygons:

* The internal angle of the polygon

* The length of the polygon’s apothem

* The length of the polygon’s radius

* The area of the polygon


A regular polygon is a polygon whose sides all have equal length and all the internal angles are equal.


REAL Mode

Print “Set Degrees 1st”

Wait 1

Print “number of sides”

Input n

Print “side length”

Input x

angle = (n – 2) / n * 180

apothem = x / 2 * tan (angle / 2)

radius = x / (2 * cos (angle / 2) )

area = n * x * apothem / 2

ClrT

Print angle

Print apothem

Print radius

Print area


Note that the calculator must be set in Degrees mode prior to running this program. To set the degrees mode, press [ SET UP ], [ B ], [ 1 ]. Note that this won’t set the angle mode indicator in the program as the angle mode change takes place outside of the program script.


Examples


Inputs: n = 6, x = 8

Outputs:

angle = 120 (internal angle)

apothem = 6.92820323

radius = 8

area = 166.2768775


Inputs: n = 12, x = 1.5

Outputs:

area = 150

apothem = 2.799038106

radius = 2.897777479

area = 25.19134295


Sharp EL-9300 Program: agm


The program agm calculates the arithmetic-geometric mean between two numbers x and y.


(x + y) / 2

√(x * y)


The program also asks for the tolerance. If the tolerance is small, it means we are asking for better accuracy at the expense of additional calculations.


REAL Mode

ClrT

Print “arithmetic/”

Print “geometric mean”

Input x

Input y

Print “tol (10^-nn)”

Input tol

Label loop

a = (x + y) / 2

g = √(x * y)

x = a

y = g

If abs(a – g) >= tol Goto loop

ClrT

Print “results”

Print a

Print g

End


Examples


Inputs: x = 15, y = 70, tol = 10^-6

Outputs:

a = 37.28076573

g = 37.28076573


Inputs: x = 1649, y = 1248, tol = 1E-7

Outputs:

a = 1441.519759

g = 1441.519759


The EL-9300 is pretty quick.


Sharp EL-9300: quadratic


The program quadratic solves the quadratic equation:


a * x^2 + b * x + c = 0


where a, b, and c can be real or complex numbers.


COMPLEX Mode

ClrT

Print “ax^2+bx+c=0”

Print “complex numbers”

Input a

Input b

Input c

x = (-b + √(b^2 – 4 * a * c)) / (2 * a)

z = x - √(b^2 – 4 * a * c) / a

ClrT

Print “solutions=”

Print x

Print z

End


Examples


Inputs:

a = 4 + 3i, b = 2 – 5i, c = 3i

Solutions:

x = 0.346818295 – 0.288439118i

z = -0.066818295 + 1.328439118i


Inputs:

a = 2, b = -6i, c = -4 + 8i

Solutions:

x = 1.370730624 + 0.040924113i

z = -1.370730624 + 2.959075887i


Sharp EL-9300 Program: twobytwo


The program twobytwo solves the simultaneous set of equations:


a * x + b * y = e

c * x + d * y = f


where a, b, c, d, e, and f can be complex numbers.


COMPLEX Mode

Print “2x2 system”

Print “complex numbers”

Print “A=((a,b)(c,d))”

Input a

Input b

Input c

Input d

Print “B=((e)(f))”

Input e

Input f

g = a * d – b * c

h = e * d – f * b

i = a * f – c * e

x = h / g

y = i / g

ClrT

Print “solutions=”

Print x

Print y

End


Examples


Input:

a = 3 + 2i, b = -i

c = 3 – 2i, d = 1 – i

e = 0, f = 5i

Outputs:

x = -0.660377358 + 0.188679245i

y = -0.754716981 + 2.358490566i


Input:

a = 3, b = -6

c = 3i, d = 6i

e = 1, f = -i

Outputs:

x = 0

y = -0.166666667


Eddie


All original content copyright, © 2011-2024. Edward Shore. Unauthorized use and/or unauthorized distribution for commercial purposes without express and written permission from the author is strictly prohibited. This blog entry may be distributed for noncommercial purposes, provided that full credit is given to the author.

Sunday, April 9, 2023

Casio fx-9750GIII: Drawing the Unit Circle with an Angle

Casio fx-9750GIII:  Drawing the Unit Circle with an Angle


Introduction


The program TRIGCIRC draws a unit circle on the left side of the screen with any angle entered.  This program is an approximate simulation to the trigonometric circle application that is set to appear on future Casio non-graphing calculators in Europe, such as Belgium version of the fx-92.  Link:  https://tiplanet.org/forum/viewtopic.php?p=271049#p271049  


The program uses the full unit circle only.  


Casio fx-9750GIII Program: TRIGCIRC

(316 bytes)


Code:


Lbl 5

ClrText

Menu "ANGLE","DEG",1,"RAD",2,"GRAD",3

Lbl 1:Deg:Goto 4

Lbl 2:Rad:Goto 4

Lbl 3:Gra:Goto 4

Lbl 4

ClrGraph

ViewWindow -1.5,5,1,-1.5,1.5,1

"ANGLE"?→A

SketchThick Circle 0,0,1

SketchThick F-Line 0,0,cos A,sin A

Text 5,70,"sin θ:"

Text 12,70,sin A

Text 19,70,"cos θ:"

Text 26,70,cos A

If cos A≠0

Then

Text 33,70,"tan θ:"

Text 40,70,tan A

IfEnd

Text 47,70,"θ:"

Text 54,70,A◢

Menu "AGAIN?","YES",5,"NO",6

Lbl 6

"END - 2023 EWS"


Program Notes:


1.  Adding a display command, ◢, after a draw command like Text freezes the draw screen.  Program execution continues by pressing [ EXE ].


2.  The Text command works with pixels rather than Cartesian points.   Line numbers range from 0 to 63, top to down.  Column numbers range from 0 to 127, right to left.


3.  Syntax of Text:  Text line number, column number, text.   Text may have a string or a variable, but not both.


4.  I have a wrap-around label (Lbl 5) to let the user enter multiple angles.


5.  Due to the linear output of the programming mode, results are shown in floating point decimal approximations.  


6.  tan x = sin x / cos x.  If cos x = 0, then tan x is undefined.   This is why the If condition is present.  


Example Screenshots


I hope you find this useful and educational.  Have an excellent day,


Eddie 


All original content copyright, © 2011-2023.  Edward Shore.   Unauthorized use and/or unauthorized distribution for commercial purposes without express and written permission from the author is strictly prohibited.  This blog entry may be distributed for noncommercial purposes, provided that full credit is given to the author. 

Saturday, February 18, 2023

Numworks Software Version 20 Now Available

 Numworks Software Version 20 Now Available 


Click here for details:

https://www.numworks.com/calculator/update/version-20/


Highlights:

*  Separate Finance and Distribution Applications

*  Pressing the divide key [ ÷ ] prior to number entry cycles between:  Ans divided by denominator, fraction, mixed fraction.  

*  Pressing the Home Key then the 0 key gets the shortcut to Settings

*  The new Elements app is available.  We can display each element by its family, s/p/d/f blocks, type of metals, molar mass, electronegativity, melting temperature, boiling temperature, and atomic radius.  Each attribute is shown separately.

* When a value is highlighted in any app, except in Python, pressing [ shift ] (sto→) will give you a prompt to store the amount in a variable.  As a reminder, variables can have more than one character.

*  In the Grapher app, points of interest (zeroes/roots, minima, maxima, points of inflection, etc.) will have black dots.

*  Also in the Grapher app, the ability to find integrals is added to the toolbox.

*  Inverse trig functions are now labeled as arcsin, arccos, and arctan.  

*  Degree and degree minute second templates are loaded from the Toolbox > Units and constants > Length and angle > Angle submenu.

* Additional information is added to angle, trigonometric, and vector calculations.  

* We can add and subtract percents directly.   


There seems to not be additions to the Python programming module (yet).


To update:  just sign in to your Numworks account.  Then connect your calculator, select Update under the Calculator and follow the prompts.  Easy as that!


Thank you, Numworks! 


Eddie


Monday, January 31, 2022

Eugene Dietzgen: Compound Trig-Easy Calculator

 Eugene Dietzgen: Compound Trig-Easy Calculator


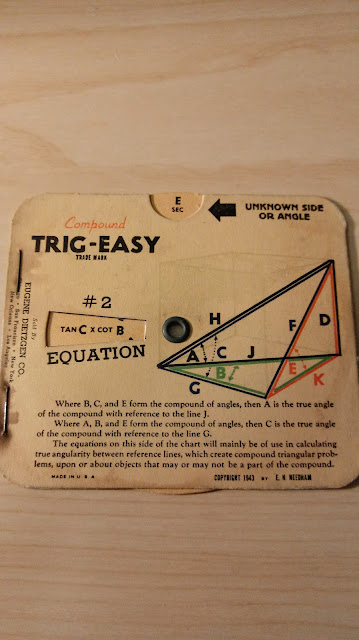
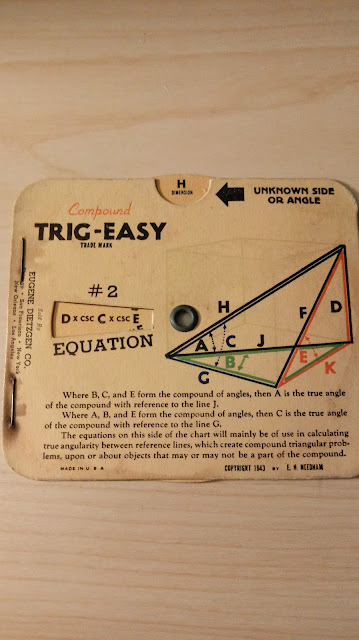
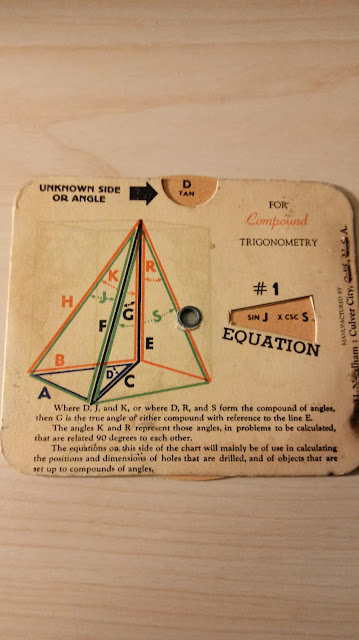
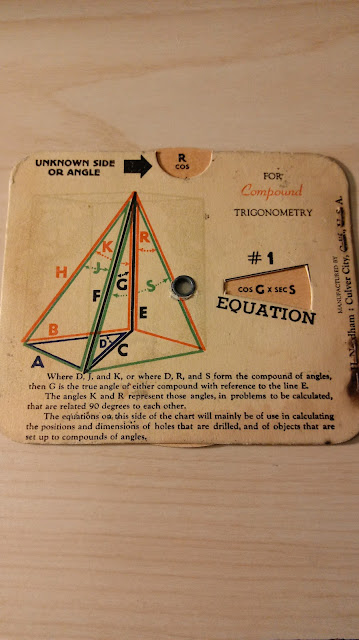
I purchased this cool, vintage formula card on Esty from the Lost Angeles Vintage Co. in Wofford Heights, California.  


The Compound Trig-Easy calculator is a 1943 formula reference card for calculating angels and lengths (dimension) of right triangle pyramids and rectangular pyramids.  Following are some example calculations.   


sec E = tan C * cot B

H = D * csc C * csc E

tan D = sin J * csc S

cos R = cos G * sec S

Eddie


All original content copyright, © 2011-2022.  Edward Shore.   Unauthorized use and/or unauthorized distribution for commercial purposes without express and written permission from the author is strictly prohibited.  This blog entry may be distributed for noncommercial purposes, provided that full credit is given to the author. 

Sunday, January 31, 2021

HP 42S/DM42 and TI-85: True Bearing vs. Compass Bearing

 HP 42S/DM42 and TI-85:  True Bearing vs. Compass Bearing


Introduction 


The program converts angles between true bearing and compass bearing.


True Bearing:  0° to 360°, going clockwise from due north.  North is typically represented as the positive y direction.  True bearing is also known as azimuth.


Compass Bearing:  The grid is divided into four quadrants, each given one direction.  Measurements from each quadrant range from 0° to 90°.


Northeast (NE):  the angle is measured from true north (positive y axis), clockwise

Southeast (SE):  the angle is measured from true south (negative y axis), counterclockwise

Southwest (SW): the angle is measured from true south (negative y axis), clockwise

Northwest (NW): the angle is measured from true north (positive y axis), counterclockwise


HP 42S/DM42 Program:  CNVANG 


00 { 263-Byte Prgm }

01▸LBL "CNVANG"

02 DEG

03 "∡?"

04 PROMPT

05 STO 00

06 "∡ CONVERSION"

07 AVIEW

08 ">COMP"

09 KEY 1 GTO 01

10 "NE>"

11 KEY 2 GTO 06

12 "SE>"

13 KEY 3 GTO 03

14 "SW>"

15 KEY 4 GTO 04

16 "NW>"

17 KEY 5 GTO 05

18 MENU

19▸LBL 00

20 STOP

21 GTO 00

22▸LBL 01

23 CLA

24 360

25 MOD

26 ENTER

27 ENTER

28 90

29 MOD

30 STO 00

31 X<>Y

32 90

33 ÷

34 IP

35 STO 01

36 0

37 X=Y?

38 GTO 07

39 R↓

40 1

41 X=Y?

42 GTO 08

43 R↓

44 2

45 X=Y?

46 GTO 09

47 GTO 10

48▸LBL 07

49 RCL 00

50 ARCL ST X

51 32

52 XTOA

53 78

54 XTOA

55 69

56 XTOA

57 GTO 01

58▸LBL 08

59 90

60 RCL- 00

61 STO 00

62 ARCL ST X

63 32

64 XTOA

65 83

66 XTOA

67 69

68 XTOA

69 GTO 01

70▸LBL 09

71 RCL 00

72 ARCL ST X

73 32

74 XTOA

75 83

76 XTOA

77 87

78 XTOA

79 GTO 01

80▸LBL 10

81 90

82 RCL- 00

83 STO 00

84 ARCL ST X

85 32

86 XTOA

87 78

88 XTOA

89 87

90 XTOA

91 GTO 01

92▸LBL 01

93 BEEP

94 AVIEW

95 GTO 11

96▸LBL 03

97 180

98 X<>Y

99 -

100 GTO 06

101▸LBL 04

102 180

103 +

104 GTO 06

105▸LBL 05

106 360

107 X<>Y

108 -

109 GTO 06

110▸LBL 06

111 STO 00

112 BEEP

113 CLA

114 "TRUE="

115 ARCL ST X

116▸LBL 11

117 CLMENU

118 EXITALL

119 RTN

120 .END.


TI-85 Program: CONVANG


ClLCD

"2020-12-31 EWS"

Degree

Input "θ? ",A

Menu(1,">COMP",A1,2,"NE>",A2,3,"SE>",A3,4,"SW>,A4,5,"NW>",A5)

Lbl A1

mod(mod(A,360),90)→B

iPart(A/90)→C

If C==0

Then

Outpt(3,1,B)

Outpt(3,17,"° NE ")

End

If C==1

Then

90-B→B

Outpt(3,1,B)

Outpt(3,17,"° SE ")

End

If C==2

Then

Outpt(3,1,B)

Outpt(3,17,"° SW ")

End

If C==3

Then

90-B→B

Outpt(3,1,B)

Outpt(3,17,"° NW ")

End

Lbl A2

A→B

Goto A6

Lbl A3

180-A→B

Goto A6

Lbl A4

180+A→B

Goto A6

Lbl A5

360-A→B

Goto A6

Lbl A6

Outpt(3,1,"TRUE= ")

Outpt(3,7,B)

Stop


Examples


To True Bearing:

35 NE> returns 35

74 SE> returns 106

20 SW> returns 200

76 NW> returns 284


From True Bearing:

35 >COMP returns 35 NE

106 >COMP returns 74 SE

200 >COMP returns 20 SW

284 >COMP returns 76 NW


Coming up in February:  a review of the TI-36 XII calculator, more programs for an old favorite, the TI-85, and much more.


Here's to the Groundhog delivering great news on 2/2/2021,


Eddie


All original content copyright, © 2011-2021.  Edward Shore.   Unauthorized use and/or unauthorized distribution for commercial purposes without express and written permission from the author is strictly prohibited.  This blog entry may be distributed for noncommercial purposes, provided that full credit is given to the author. 


Saturday, October 10, 2020

Sines and Cosines: Adding and Subtracting Angles

 Sines and Cosines:   Adding and Subtracting Angles


Note:   


π/2 radians = 90°,   π radians = 180°


Sine


sin(x + π/2) = sin(x) cos(π/2) + cos(x) sin(π/2) = cos(x)


sin(x - π/2) = sin(x) cos(π/2) - cos(x) sin(π/2) = -cos(x)


sin(π/2 - x)  = sin(π/2) cos(x) - cos(π/2) sin(x) = cos(x)


sin(x + π) = sin(x) cos(π) + cos(x) sin(π) = -sin(x)


sin(x - π) = sin(x) cos(π) - cos(x) sin(π) = -sin(x)


sin(π - x)  = sin(π) cos(x) - cos(π) sin(x) = sin(x)


Cosine


cos(x + π/2) = cos(x) cos(π/2) - sin(x) sin(π/2) = -sin(x)


cos(x - π/2) = cos(x) cos(π/2) + sin(x) sin(π/2) = sin(x)


cos(π/2 - x) = cos(π/2) cos(x) + sin(π/2) sin(x) = sin(x)


cos(x + π) = cos(x) cos(π) - sin(x) sin(π) = -cos(x)


cos(x - π) = cos(x) cos(π) + sin(x) sin(π) = -cos(x)


cos(π - x) = cos(π) cos(x) + sin(π) sin(x) = -cos(x)


Eddie


All original content copyright, © 2011-2020.  Edward Shore.   Unauthorized use and/or unauthorized distribution for commercial purposes without express and written permission from the author is strictly prohibited.  This blog entry may be distributed for noncommercial purposes, provided that full credit is given to the author. 


Sunday, April 7, 2019

HP Prime and TI-84 Plus CE: Drawing Angles

HP Prime and TI-84 Plus CE:  Drawing Angles

Introduction

The program DRAWANG draws an angle.  You give the starting line from coordinates (0,0) to (A,B).  The origin is given automatically.  The calculator will then a draw a line that results from the given angle θ from the origin to a calculated point. 

The calculator will work in the angle mode your calculator mode is currently set.

For clockwise angles, enter θ as negative.

For counterclockwise angles, enter θ as positive.

HP Prime Program DRAWANG

EXPORT DRAWANG()
BEGIN
// 2019-04-04 EWS
STARTAPP("Function");
Xmin:=−11; Xmax:=11;
Ymin:=−11; Ymax:=11;
LOCAL A,B,C,D,R,θ,Z;
INPUT({A,B,θ},"Begin Point (A,B)
; Angle θ",{"A:","B:","θ:"},
{"−10≤A≤10","−10≤B≤10","Angle"});
R:=√(A^2+B^2);
Z:=θ+ARG(A+B*i);
C:=R*COS(Z); D:=R*SIN(Z);
RECT();
// Axes
LINE(−11,0,11,0,#D0D0D0h);
LINE(0,−11,0,11,#D0D0D0h);

// Angle
LINE(0,0,A,B,#FF0000h);
LINE(0,0,C,D,#0000FFh);
TEXTOUT("Angle: "+STRING(θ),
−11,11,3,#006000h);
WAIT(0);
END;

(Alternatively, with HComplex set to 1  (allow complex numbers from real input, and display them as a+bi):

EXPORT DRAWANG()
BEGIN
// 2019-04-04 EWS
HComplex:=1;
STARTAPP("Function");
Xmin:=−11; Xmax:=11;
Ymin:=−11; Ymax:=11;
LOCAL A,B,C,D,R,θ,Z;
INPUT({A,B,θ},"Begin Point (A,B)
; Angle θ",{"A:","B:","θ:"},
{"−10≤A≤10","−10≤B≤10","Angle"});
R:=√(A^2+B^2);
Z:=θ+ARG(A+B*√(-1));
C:=R*COS(Z); D:=R*SIN(Z);
RECT();
// Axes
LINE(−11,0,11,0,#D0D0D0h);
LINE(0,−11,0,11,#D0D0D0h);

// Angle
LINE(0,0,A,B,#FF0000h);
LINE(0,0,C,D,#0000FFh);
TEXTOUT("Angle: "+STRING(θ),
−11,11,3,#006000h);
WAIT(0);
END;

The latter program can be copied straight from the blog as text.  The former will be needed to type in manually. 


TI-84 Plus CE Program DRAWANG

"2019-04-04 EWS"
Func
ZStandard
PlotsOff 
FnOff 
ClrDraw
AxesOn 
Disp "BGN POINT (A,B)","­10≤A≤10,­10≤B≤10","θ: ANGLE"
Prompt A,B,θ
√(A²+B²)→R
θ+R▶ Pθ(A,B)→Z
R*cos(Z)→C
R*sin(Z)→D
Line(0,0,A,B,RED)
Line(0,0,C,D,BLUE)
TextColor(GREEN)
Text(0,0,"ANGLE: "+toString(θ))
DispGraph


Eddie

All original content copyright, © 2011-2019.  Edward Shore.   Unauthorized use and/or unauthorized distribution for commercial purposes without express and written permission from the author is strictly prohibited.  This blog entry may be distributed for noncommercial purposes, provided that full credit is given to the author.

Friday, November 6, 2015

HP Prime Geometry App Tutorial Part 2: Triangles

HP Prime Geometry App Tutorial Part 2:  Triangles

Like Part 1, we’ll use a Plot window of XRange = [ -16, 16 ], YRange = [ -11, 10.9 ], ticks are at 1.  For this lesson, we are going to focus on triangles.  Start with a clear Plot Screen ([Shift], [ Esc ] (Clear)).

Drawing a Triangle

1.  On the plot screen, press the soft key (Cmds), then select 4 for Polygon and 1 for Triangle. 
2.  Select the first vertex (corner point) and press [ Enter ].  For this lesson, put the triangle wherever you want.
3.  Place the second and third vertex.  Press [ Enter ] after each point.  The vertices are labeled A, B, and C. 


Finding an Angle

The steps will demonstrate how to find the angle.  Be aware that the direction you enter the vertexes will determine the sign of the angle. 

1.  Press (Cmds), 9 for Measure, 6 for Angle.
2.  Select one vertex, press [Enter].  Follow the triangle to select the second vertex (where the angle will be measured), press [ Enter ].  Follow that with a third vertex and press [Enter].  The angle displayed on top of the screen.


Resizing the Triangle

Click on one of the points of the points.  Then drag the point with the arrow pad.  When satisfied, press [ Enter ].


For the last part, clear the screen.

Reflect a Triangle – reflect about a point

1.  Clear the screen.  ([ Shift ] [ Esc ] (Clear))
2.  Draw a triangle with the vertices (-6, -4), (-6, 4), and (-12, 0).
3.  Press (Cmds), 7 for Transform, 2 for Reflection.
4.  You will be promoted for a reflection point.  For this exercise, set the point at (0,0). 
5.  Select the triangle (scroll until the triangle turns red) and press [ Enter ].


In Part 3, we’re going to work with lines and line segments.  Until next time, have a great day!

Eddie


This blog is property of Edward Shore.  2015.


Earth's Radius by Latitude

Earth's Radius by Latitude Introduction: Calculating the Earth’s Radius In quick, general calculations, we assume that the...